How Debian packaging works


Debian packaging can be quite mysterious and hard to figure out. In this guide I’ll provide a simple introduction into the Debian packaging process and its most important concepts.
This is not a full guide into all aspects of packaging. Instead, I’ll cover just enough of the basics to help you develop a mental model of what Debian packaging is about, and to be able to produce useful results.
I’ll cover:
- What a Debian package is.
- The anatomy of a package.
- How to inspect a package.
- How to create a package.
- What APT repositories are.
- How to create an APT repository.
Table of contents
- What is a Debian package?
- Two layers of package management tooling: dpkg and APT
- Packaging without Debian
- Inspecting a package with dpkg
- Inspecting a package with Midnight Commander
- Creating packages with FPM (a.k.a. the easy way)
- The official package creation process (a.k.a. the hard way)
- What is an APT repository?
- Creating an APT repository with aptly
- Conclusion
What is a Debian package?
A Debian package contains metadata and files. The metadata contains the package name, description, a list of dependencies, and more. The files are extracted into the filesystem root (/), so the file paths in a package are absolute paths.
So a Debian package file — a .deb file — is sort of like a tar.gz or zip. It’s not actually a tar.gz or zip: the format is ar although that’s not important.
Debian packaging, in its simplest form, thus involves creating a .deb file with the metadata and files that you want to put inside it.
Two layers of package management tooling: dpkg and APT
The Debian packaging system actually consists of two parts. The lowest part is dpkg and is what manages the system’s database that describes which packages are installed. Dpkg can install .deb files and remove already-installed packages.
APT handles downloading .deb files from the Internet, as well as dependency resolution. Dpkg does not handle that. That’s why users usually only interact with APT, even though dpkg is the part that performs the core of the work.
The dpkg-APT relationship is like the RPM-DNF relationship on RHEL/CentOS (or RPM-YUM on older versions).
Packaging without Debian
You actually don’t need to run Debian/Ubuntu in order to create and inspect Debian packages! The Debian package manager dpkg is available on other operating systems too. Just don’t expect to be able to install any useful packages.
Go ahead and install dpkg, because the rest of this article assumes that you have it.
# RHEL/CentOS; make sure EPEL is enabled first
yum install dpkg

# macOS
brew install dpkg
Inspecting a package with dpkg
Download a random .deb file to work with.
Inspecting metadata
You can inspect a Debian package’s most important metadata — the “control” section — as follows:
dpkg-deb --info passenger-dev_6.0.6-1~xenial1_amd64.deb
Which outputs:
 new Debian package, version 2.0.
 size 4237584 bytes: control archive=3124 bytes.
     841 bytes,    20 lines      control
    8644 bytes,    79 lines      md5sums
 Package: passenger-dev
 Source: passenger
 Version: 1:6.0.6-1~xenial1
 Architecture: amd64
 Maintainer: Phusion <info@phusion.nl>
 Installed-Size: 41972
 Depends: ruby2.7 | ruby2.6 | ruby2.5 | ruby2.4 | ruby2.3 | ruby2.2 | ruby2.1 | ruby2.0 | ruby1.9.1 | ruby1.8 | ruby-interpreter, passenger (= 1:6.0.6-1~xenial1)
 Conflicts: ruby-passenger-dev
 Replaces: ruby-passenger-dev
 Provides: ruby-passenger-dev
 Section: ruby
 Priority: optional
 Homepage: https://www.phusionpassenger.com/
 Description: Dependencies for compiling an Nginx module
  Convenience package that helps users to easily create
  a custom compilation of Nginx and the Passenger
  application server. Passenger is a Phusion product that
  makes deployment of web apps very easy and robust.
  .
  This convenience package provides the development dependencies for compiling an Nginx module.
Most of the fields are pretty self-explanatory. For an overview of all fields, and a deeper explanation of what they mean, have a look at the Debian Policy Manual.
There’s more metadata than just the control section. You can view the other metadata by extracting all metadata to files:
dpkg-deb --control passenger-dev_6.0.6-1~xenial1_amd64.deb
The above extracts the metadata to the current working directory, in a subdirectory called DEBIAN. In case of the passenger-dev package, the only other metadata present is an md5sums file:
5613a201b8ff4e15a1c55c46678e8d48  usr/lib/passenger/common/libboost_oxt.a
9240bd822145a709fc24ed6e5d80e115  usr/lib/passenger/common/libpassenger_common/Algorithms/Hasher.o
eaecffb28791bddda583f4869867083f  usr/lib/passenger/common/libpassenger_common/AppTypeDetector/CBindings.o
...
Inspecting files
You can inspect a package’s files as follows:
dpkg-deb --contents passenger-dev_6.0.6-1~xenial1_amd64.deb
This prints:
drwxr-xr-x root/root         0 2020-07-14 04:40 ./
drwxr-xr-x root/root         0 2020-07-14 04:40 ./usr/
drwxr-xr-x root/root         0 2020-07-14 04:40 ./usr/lib/
drwxr-xr-x root/root         0 2020-07-14 04:40 ./usr/lib/passenger/
drwxr-xr-x root/root         0 2020-07-14 04:40 ./usr/lib/passenger/common/
drwxr-xr-x root/root         0 2020-07-14 04:39 ./usr/lib/passenger/common/libpassenger_common/
drwxr-xr-x root/root         0 2020-07-14 04:39 ./usr/lib/passenger/common/libpassenger_common/JsonTools/
-rw-r--r-- root/root    785616 2020-07-14 04:39 ./usr/lib/passenger/common/libpassenger_common/JsonTools/CBindings.o
...
Inspecting a package with Midnight Commander
For those who prefer to a more visual way to inspect the contents of a package, there’s Midnight Commander. It’s a terminal-based visual file manager, which can peek inside many types of archives, including Debian packages.
Install it with:
# Debian/Ubuntu
apt install mc

# RHEL/CentOS
yum install mc

# macOS
brew install midnight-commander
Midnight Commander’s Debian package support requires dpkg to be installed, so be sure to have it installed.
Open Midnight Commander…
mc
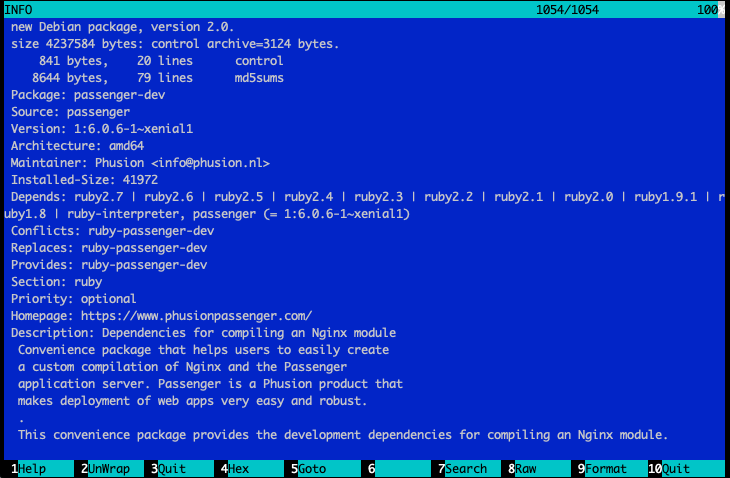
…then open a .deb file. You should see a file listing. Here’s what they mean:
- CONTENTS/ — package files (equivalent to
dpkg-deb --contents) - DEBIAN/ — all metadata files (equivalent to
dpkg-deb --control) - INFO — just the control file (equivalent to
dpkg-deb --info)
View the INFO file by selecting it and pressing F3, and you should see the control metadata in all its glory:
Creating packages with FPM (a.k.a. the easy way)
The easiest way to create a Debian package is with FPM. FPM is a CLI tool. You tell FPM what metadata and files you want to put in the package, and it does just that.
Note that using FPM is not the “right” way to create a Debian package if you want to submit a package for inclusion in a Linux distribution. If that’s not your goal, then FPM is fine. We’ll get back later to what “the right way” means.
FPM requires dpkg, so make sure you have that installed already.
FPM is written in Ruby, so you can install it with the RubyGems package manager:
gem install fpm --no-document
To see it in action, let’s use FPM to make a simple package that contains a file called /usr/share/doc/mypackage/README.txt, and which depends on ‘curl’:
echo 'hello FPM' > README.txt
fpm \
  --input-type dir \
  --output-type deb \
  --name mypackage \
  --version 1.0.0 \
  --architecture all \
  --package mypackage_1.0.0_all.deb \
  --depends curl \
  README.txt=/usr/share/doc/mypackage/
Many more customization options are available. See fpm --help.
Congratulations! You’ve created your first Debian package. But having a .deb file just gets you half way: you also need an APT repository, because users seldomly interact with individual .deb files. We’ll get back to that later.
The official package creation process (a.k.a. the hard way)
How come FPM is not the “right” way to package if you want to submit your package for inclusion in Linux distributions? It’s because distributions want you to fully describe the entire package building process, and because using FPM does not adhere to their process standards.
Think about how the full package building process looks like:
- Get the source code.
- Compile the source code.
- Create the package file. Here you map files in the source tree, and compilation artifacts, into files inside a package.
FPM only covers step 3. It creates a so-called binary package.
Distributions expect you to create a so-called source package, which contains files that describe steps 1 and 2. You then submit the source code package — not the binary package — to distributions, and they build the binary package for you.
How to create a source package, and how the official Debian packaging process works, is outside the scope of this article. In any case, that process, and the surrounding tooling, are quite arcane, badly documented, and frankly a usability nightmare. If they weren’t, you wouldn’t be reading this article in the first place. I do not recommend using the official process or the official tools, unless your explicit goal is to contribute to distributions. Stick with the easy way for as long as you can.
What is an APT repository?
A repository is a directory which contains one or more packages (.deb files), as well as metadata files that contain:
- Files that list which packages exist in the repository.
- A copy of all packages’ control metadata.
- Checksums and signatures.
A repository is usually served over HTTP, but can also be a local directory.
Distributions, components and architectures
A single repository can contain packages for multiple distributions. But note that the concept of “distribution” should be taken with a grain of salt. For example, the official Ubuntu repository defines “bionic”, “bionic-updates” and “bionic-backports”. As far as APT is concerned, a “distribution” is just a name, for APT to figure out which subdirectory to choose.
A repository can also be organized in multiple components. Users can opt-in for specific components. For example, the official Ubuntu repository has the components “main”, “multiverse”, “universe” and more.
Finally, a repository is also organized in architectures. APT only downloads packages intended for the current system’s architecture.
Real-life repository example
Let’s take a look at a real-life example of a repository. If we look in /etc/apt/sources.list on an Ubuntu system, then we see lines like this:
deb http://archive.ubuntu.com/ubuntu   bionic   main restricted
#   |-------------- 1 --------------|  |- 2 -|  |----- 3 -----|
Here’s what the line means:
- The URL of the repository.
- Which distribution within the repository to pick.
- Which components within (2) to pick.
If we head to archive.ubuntu.com/ubuntu, then we see many files. Here are some interesting parts:
pool/contains the actual .deb files, for all Ubuntu distributions.dists/<DISTRO>/<COMPONENT>/binary-<ARCH>contains the repository metadata files for a particular distribution, component and architecture.
APT repository tooling
There are many tools available to create a APT repositories. But most of them are not… ahem… sane: bad documentation, bad usability.
An often used hosted solution for “third-party” packages (packages that are not part of a distribution) is Ubuntu PPAs (Personal Package Archives). However, I do not recommend it because Ubuntu PPA expects you to upload source packages only — they will handle building binaries for you. This means you have to use the official Debian packaging tooling, which makes everything exponentially harder. Furthermore, the Ubuntu PPA user interface is very confusing, and its package uploading process is very primitive, cumbersome and unforgiving. It literally involves uploading raw files to an FTP server, and waiting for an email with the build results.
The most friendly open source, self-hosted solution I’ve seen is Aptly. Just be sure to use version 1.4 or later. Earlier versions have pretty bad bugs.
Another option is Bintray. Bintray is a commercial, hosted solution. They provide a free plan for open source projects. Unlike Ubuntu PPAs, they don’t build binaries for you — you are supposed to upload binary packages and not source packages. This makes Bintray significantly easier to use than PPA because you don’t have to adhere to the official package creation process.
Creating an APT repository with aptly
Aptly does not directly operate on the APT repo files of the sort that you see in archive.ubuntu.com/ubuntu. Instead, it operates primarily on an internal database. You then tell Aptly to publish (export) its internal database to a “real” APT repository, in the format that APT expects.
The Aptly internal database is stored in ~/.aptly by default. When you tell Aptly to publish its internal database, it publishes to ~/.aptly/public by default. Both of these paths are customizable through the Aptly configuration file, but for the purposes of this demo let’s stick to the default paths.
So let’s see it in action. First, tell Aptly to create a repository named “myrepo”:
aptly repo create myrepo
Next, import the .deb file we created, into the “myrepo” repository.
aptly repo add myrepo /path/to/mypackage_1.0.0_all.deb
We now have an internal repository with one package in it. To publish it to a “real” APT repository, we have to create a publication that’s linked to a particular repository.
The package we built is distribution-agnostic and architecture-agnostic. So let’s say that it belongs to the “agnostic” distribution, the “main” component, and the “amd64” (Debian’s name for x86_64) architecture.
APT repositories are normally GPG signed, but in this demo we’ll skip signing in order to avoid going through the trouble.
Create the publication as follows:
aptly publish repo -skip-signing -distribution=agnostic -component=main -architectures=amd64 myrepo
Now we have an APT repository in ~/.aptly/public:
$ find ~/.aptly/public/dists/agnostic -type f
~/.aptly/public/dists/agnostic/Contents-amd64.gz
~/.aptly/public/dists/agnostic/Release
~/.aptly/public/dists/agnostic/main/Contents-amd64.gz
~/.aptly/public/dists/agnostic/main/binary-amd64/Packages.gz
~/.aptly/public/dists/agnostic/main/binary-amd64/Release
~/.aptly/public/dists/agnostic/main/binary-amd64/Packages.bz2
~/.aptly/public/dists/agnostic/main/binary-amd64/Packages
Let’s try to use this APT repository on a Debian or Ubuntu server. We tar up this repo and copy it to a Debian/Ubuntu server:
tar -C ~/.aptly/public -czf myaptrepo.tar.gz .
scp myaptrepo.tar.gz mydebianserver.com:
Then we login to the Debian/Ubuntu server, extract the tarball somewhere, and add it as an APT source:
# On the Debian/Ubuntu server:
mkdir myaptrepo
tar -C myaptrepo -xzf myaptrepo.tar.gz
echo "deb [allow-insecure=yes] file:$(pwd)/myaptrepo agnostic main" \
  | sudo tee /etc/apt/sources.list.d/myaptrepo.list
Then install the package and verify that it works:
# On the Debian/Ubuntu server:
sudo apt update
sudo apt install mypackage
cat /usr/share/doc/mypackage/README.txt
# => hello FPM
Conclusion
Most Debian packaging documentation out there are about the official packaging process for Linux distributions. For some reason, the use case of independent software vendors, or the use case of people who just want to package their internal apps for their internal infrastructure, is widely neglected. They shouldn’t be. I hope that with this guide, you’ve been able to make sense of Debian packaging, and that I’ve helped you on your way to create your own packages. Good luck!